)
)


How to use generative fill (step-by-step)
)
)
AI-powered image editors are on a rapid growth pace. As of 2024, the estimated market size for AI image editors is $80.3 million. The industry is expected to grow at a compound annual growth rate of 10.50% through 2035, capping out at $217.9 million by the end of the next decade.
This growth is driven by consumer demand. And that consumer demand is being fuelled by rapid developments in generative AI technology. Generative fill—and AI inpainting—is one of those technologies that’s both fuelling growth, unlocking a new world of creative possibilities, and reshaping the world of photo editing.
This article will walk you through how to use it.
What you’ll learn:
What is generative fill?
How to use generative fill in your images
How to use generative fill to remove objects
How to use generative fill to add objects
How to use generative fill to expand and create backgrounds
Tips for optimal results with generative fill
What is generative fill?
Generative fill is a photo editing tool or feature that uses AI to automate image editing tasks through a text prompt and selection tools. It’s the term first used by Adobe Photoshop to describe both the digital “AI inpainting” and their tools that offer this functionality.
📘 Additional reading: Best generative fill alternatives for 2024
So, generative fill is another word for AI inpainting. But what’s AI inpainting?
AI inpainting is a process that allows users to select a portion of a digital image and either add newly generated content or remove existing content.
Specifically, you can:
Delete specific objects within an image. The generative AI tool will fill in the delete area with data from the surrounding pixels, making it look like the image was never there.
Create entirely new objects. Using text prompts, users can access generative fill tools and ask them to add new objects and other image elements that are not part of the original photo.
In both cases, generative AI is used to alter the image to create a seamless new composition in just a few clicks.
The yin to AI inpainting’s yang is AI outpainting. This is the process of using a generative AI model to extend the photo beyond its existing canvas. This is a similar process to inpainting, but instead of creating new regions inside of the image, it generates new regions outside of it.
How to use generative fill in your images
There are three main ways to use generative fill in your image editing:
To remove objects
To add objects
To expand and create backgrounds
The first two—removing and adding objects—are examples of AI inpainting.
The third—expanding and creating backgrounds—falls under the outpainting category. All, however, rely on generative AI photo editing apps, like Photoroom, to create images and new compositions.
The next section will walk you through how to do each of the above using Photoroom.
How to use generative fill to remove objects
Photoroom’s AI Retouch tool is an amazing tool that allows users to highlight and remove objects within an image in a matter of seconds.
This allows users to:
Remove unwanted objects in the image
Alter the original image to focus more on the main subject
Clean up and remove blemishes and other imperfections in the image
Currently, users can brush over an object with their finger, and the Photoroom app will automatically remove it, filling in the background with data from the surrounding pixels.
AI Fill, which will be released soon, takes this one step further by allowing users to not only delete objects within an image, but replace them with new objects created with text prompts.
Here's how AI Retouch works in Photoroom
Open the Photoroom app (or use it here on this webpage)
Tap “Retouch”
Select the image you want to edit from your camera reel
Increase or decrease the brush width to your desired size
Use your finger to paint over the object in your image that you want to remove
Repeat the process until the entire object has been removed
The background of the image will adapt around the deleted object to create a new, clean image. Photoroom will remove the object and fill in the background as if the object was never there.
Tap the curved arrow icon at the top of your screen to undo your edits
Once done, click “Next” and perform any final edits you’d like to make to the image
Export to the image and save it to your phone
Here’s a video showing how this process works in practice:
How to use generative fill to add objects
With AI Fill, once launched, users will be able to perform the above process, but go one step further to replace the delete object with entirely new ones.
Users will be able to add text-based AI prompts that ask Photoroom to generate entirely new objects, either in addition to what’s already in the image, or to replace one that has already been deleted.
This generative fill tool allows you to not only edit down images, but also add new objects and elements to the image to create entirely new scenes and composition. This is the future of generative fill technology on Photoroom.
Tip: Another way to add objects to an image through Photoroom, which is live and available now, is through the AI Backgrounds tool. This allows you to generate backgrounds with a text prompt, which can also include new props and objects.
Here's how it works in Photoroom
Open Photoroom
Tap AI Backgrounds
Select the photo you want to edit
The tool will automatically remove the background
From here, tap “Create a background”
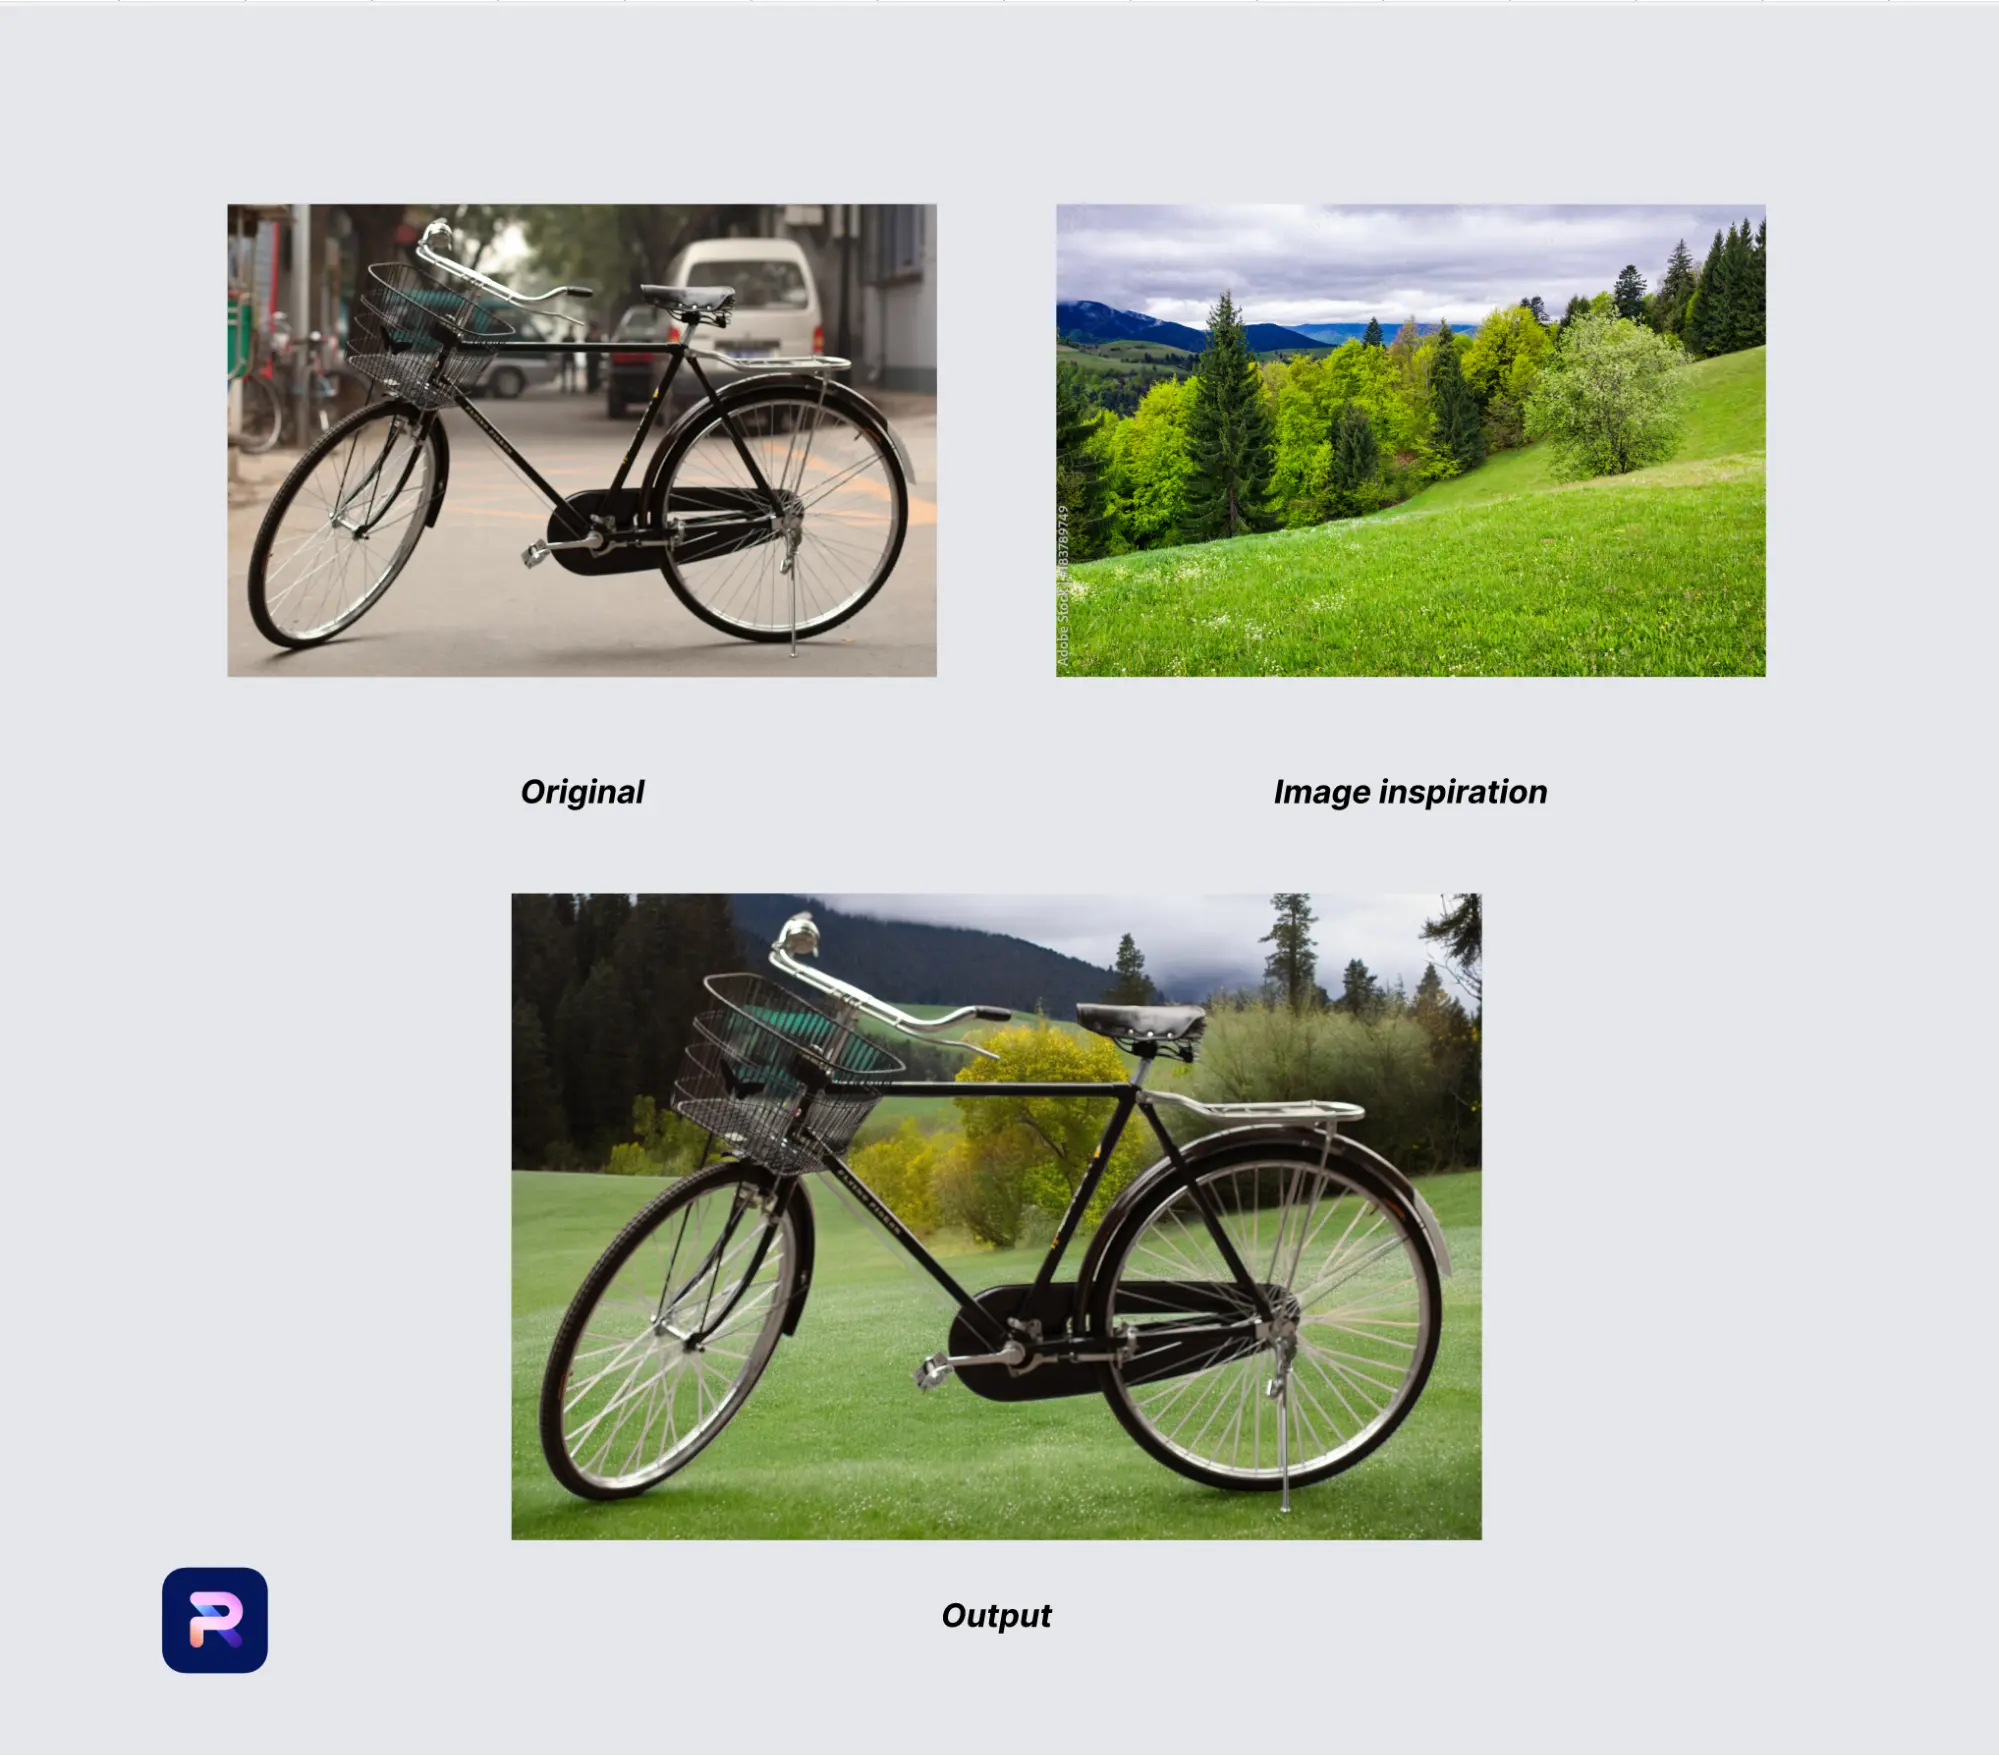
This will bring you to a screen where you can either input text prompts or upload or select an existing image to use as inspiration for a new background
For text prompts, type a text prompt for “Your subject on” and “With”
We’ll dig more into the background side of this process below
The “With” text prompt is an existing way to add new objects to the background
 For image prompts, toggle over to the tab that says “Image”.
Either select an image from the Inspirations feed on this page, or tap “Select an Image” to choose one from your camera roll.
This process allows you to play around with new background compositions, and to add new background objects into the image
How to use generative fill to expand and create backgrounds
Further to the above, generative fill can also be used to expand the backgrounds of an image beyond its original borders—aka outpainting—and to create entirely new ones.
Both of these options have obvious benefits for anyone who uses images as part of their business.
First, being able to expand images beyond their border in seconds makes it exceedingly easier and faster to change the dimensions and size of your image to fit virtually any need you can think of.
Say you have a high-quality image that’s sized at 500px by 500px. What if you required that to be 750px by 750px, but didn’t want to expand or distort the pixels? Generative fill can do this by reading and extending the pixels along the border of your image, creating a large photo, without the distortion.
Second, being able to remove the background of product images—and add entirely new ones in its place—gives you near endless variations to use from the same original shot. You can place the product in a variety of different settings, creating new atmospheres and staging opportunities for different campaigns and promo purposes.
Furthermore, generative fill allows you to:
Easily manipulate images and objects, and blend them with other settings
Align colors and environments with your brand and website
Repurpose and repackage product images across multiple platforms
Here's how it works in Photoroom
Open Photoroom
Tap AI Backgrounds
Select the photo you want to edit
The tool will automatically remove the background
From here, you have three options
Select a suggested background. These are AI generated backgrounds that Photoroom has created based on the object and context of the photo
Use text prompts to generate entirely new backgrounds with generative AI
Select an image that will be used to inspire the creation of a new background
This process takes a matter of seconds, and allows you to remove the existing background and replace it with one created with generative AI.
Expanding the background beyond the original frame can be accomplished within the Photoroom’s Resize tool. This feature is available to all iOS users, and is coming to all platforms soon.
Here’s how to do that:
Select the new image background you want to use or use the original background
On the Export screen, select “Resize”
You’ll then see a variety of preset dimensions to choose from
Select the size that you need
Click Resize
As you choose new image sizes, the image background will adapt and expand to fill in the new image areas—this is generative fill in action (specifically, outpainting).
You can also select custom sizes if you want to create larger images. If you do, Photoroom’s generative AI technology will also fill that space. This means you can shrink, enlarge, and crop images as you need to, with the background adapting to the new dimensions.
Tips for optimal results with generative fill
Using generative fill to edit and enhance photographs takes some practice. It’s a new technology, so not many people have reached expertise status with these tools just yet.
That being said, there are two main tips we’d like to share to new generative fill users: prepare your image properly, and experiment with AI prompts.
Image preparation tips
Like with any photo editing process, starting with a high-quality image is ideal when using generative fill. Your main subject should be clearly focused and well-positioned in the frame. This makes it easier to generate new backgrounds and objects that relate to that main subject.
That being said, one of the main benefits of generative fill tools like Photoroom is that they allow you to correct imperfections in an image. That means that the photo doesn’t have to be perfect, or shot with a super high-quality camera. It just has to be of a good enough size and composition so that the tool can understand and enhance what’s already there.
As mentioned, extra objects and blemishes can be removed through Photoroom’s Retouch tool. Other issues like lighting and adding the appropriate shadows can also be fixed, if needed.
Experimenting with text and visual prompts
Most of the new objects and background compositions that come out of generative fill tools happen because of text-based AI prompts. These are instructions or descriptions that you provide to the AI tool to instruct it toward your desired results.
When you input an AI prompt, the image editor analyzes that text against its training data, looking for patterns and references that match your description. Once it’s made sense of that prompt, it then delivers outputs.
Use a generative fill tool for five seconds, and you’ll quickly realize that the outputs aren't always exactly what you want. There are nearly endless ways to prompt and instruct an AI, and it will always have a slightly different interpretation of your prompt than what’s in your head.
This means that experimentation is key. And so is following some AI prompt best practices.
In particular, try to make sure your AI prompts involve:
Clarity. Be specific about the elements you want in your image, such as the types of objects, the settings, and the main focus.
Descriptiveness. Describe not just the object, but also the mood, lighting, style, and even textures that you want to see.
Creativity. Don’t shy away from proposing unconventional or imaginative ideas. AI is great at delivering new and unexpected results.
Open-endedness. Don’t be too restrictive or prescriptive with your prompts, but still give enough detail to point the AI in the right direction.
When writing AI prompts for a new background for a product image, for example, we recommend:
Providing specific product context—what it is, its intended use, and its emotional appeal
Describe the product style—use words to describe the personality traits you would assign to your product (fun, whimsical, vibrant, etc.)
Add contextual cues—think about where the product would ideally be used or placed and include that context in the prompt
Here are some AI prompt examples to get you thinking:
A minimalist, elegant background with a soft, neutral color palette and subtle shadows, conveying a sense of sophistication and high quality.
An outdoor setting with a vibrant, natural landscape, featuring lush greenery and a clear blue sky, ideal for products related to outdoor activities or eco-friendliness.
A modern, urban environment with sleek architectural elements and a monochrome color scheme, perfect for tech or lifestyle products.
A rustic, vintage background with warm, earthy tones and textures like aged wood and weathered stone, suitable for artisanal or heritage products.
📘 Additional reading: How to create AI prompts for background images [+ 50 examples]
Getting the right image takes time, trial, and error. Experiment with various AI prompts, object removal techniques, and resizing processes to get the best results from these tools.
Conclusion
Generative fill is redefining what is possible with photo editing and manipulation. And tools like Photoroom are putting that powerful, AI-driven technology in your pocket so that you can edit and expand images anywhere.
Try Photoroom for yourself today. It’s accessible on both mobile devices and desktop, and can be downloaded from the App Store, the Google Play Store, or by using Photoroom Web. Set up your account in less than a minute, and start saving valuable time for the tasks you love the most.
Generative fill FAQs
What is generative fill?
Generative fill—aka Photoshop generative fill—is an industry term first used by Adobe Photoshop to describe the process of AI inpainting. Many tools, like Photoshop AI generative fill, use a generative AI model to facilitate the creation and alteration of objects and backgrounds within an image.
What are some use cases for generative fill?
Some use cases for generative fill include removing unwanted objects or blemishes from an image, or creating entirely new objects to change the composition.
What is inpainting?
Inpainting is an image editing process that allows users to select a portion of a digital image and add newly generated content—or remove existing objects—thereby modifying the image.
What’s the difference between inpainting and outpainting?
Inpainting is the process of modifying content within the frame of an image, whereas outpainting is the process of expanding the image beyond its original frame.
Related articles